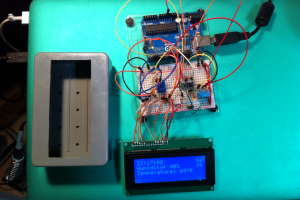
I am in the middle of an Arduino, clock, humidity, and temperature project. I also want to breadboard an ILI9341 display and an Arduino. I should be finishing the clock before starting the other display.
Let me tell you about the clock. Well, after I go clean and repair the heater.
I got the heater repaired. There was a burned out wire connection bus. I put a crimp splice onto it. I think it goes to the heating element, or the fan. You should see all of the LEDs and resistors to provide the fake flame effect. Nice. I’ll get to scavenge those later. Now I have to hit the treadmill for a half hour. BRB.
Now that I have that out of the way. An hour of exercise today. Half hour on the treadmill. Earlier I used the Bowflex.
I bought a 20×4 LCD to use with the Arduino Uno. I already had bought a DHT11 from Adafruit quite a while back. In the same purchase I also bought a potentiometer. Wow, that was just the one I needed to use to adjust the contrast of the LCD.
I soldered wires to the connection points of the LCD circuit board, stripped the ends and stuck them in the half-size breadboard. After adding quite a few jumper wires, the potentiometer and a resistor, I had the LCD up and running. I ran a few sketches to see how the display worked, One was the ‘Hello World’ sketch. Then I was off and running. I wanted to change the count up numbers, seconds since getting power, into a real clock. That took a little bit of formatting the lcd.print statements.
After getting the clock numbers set up I decided to add the DHT11 to display humidity and temperature. I added the DHT, a resistor, and some jumper wires. The data from the DHT comes with decimal points. I didn’t care about 41.00% humidity. All I wanted was the integer for the humidity and degrees. (int) helped with that. It was that easy.
Next I decided to learn how to add custom characters to the LCD. I wanted to have the degree symbol, °. I read a couple of web pages and figured it out without too much hassle. However, I could not get memory slot 0 to display. So I stuffed the ° into 5.
I thought, “what about buttons to adjust the time?” First I added a button for the minutes. It also needed a resistor. Pressing the button increments the minutes that are displayed. After 59 minutes the next button press goes to 0. Also, holding down the button only increments the minutes one time. Then I added a button for the hours digits. If the number is less than 10 a leading 0 is printed before the time digit.
Just for kicks I decided to see what a graphic in four characters would look like displayed in the top right corner. I tried to make the Skull and Cross Wrenches logo of Hackaday.
I’ve decided to mount this all into a plastic soap box. I’ve had the Clinique For Men’s soap box for years. Maybe thirty? I took some measurements of the LCD. Drew them on a piece of paper. Taped the paper to the lid of the soap box and drew around it with a pencil. I mounted a cutting disk for a Dremel tool into a battery operated drill. I figured the drill would rotate slower. If it spun too fast the plastic lid would just heat and make a melty mess. With the hold for the LCD roughed out I used the file on my Swiss Army Knife to file and shape the hole.
The next part of this project is going to be soldering all of the parts onto a predrilled circuit board and add a bareduino. I’ll have to scav the main chip from my other breadboard. Then I’ll order some more ATMEGA328p chips. I am waiting for some sockets from Futurlec to arrive. I’d hate to burn out the chip when soldering the legs onto the circuit board. If I am running out of time I can get one from Radio Shack. There is still one in Ukiah.
I’ll run this up the flagpole and see if anyone salutes. The next post should be about being finished with putting all of this into the soap box.


Loving it! 😀
Thanks. I am so scattered. Trying to get the ILI9341 or ILI9340 to display properly on the screen. I’ll get back in control. Until then I’ll just troll. Lashara.