In the previous article (I am adding a link so the analysis will be happier) Part 1 I discussed my troubles trying to blink an LED on the Hackaday 2019 Badge. I decided to post the full FPGA code that finally works. I got two different versions.
After getting proper results with the one code, I decided to try out the different way. The assign ledc[5] = 1'b1; to turn on the LED at start was my problem all along.
initial begin counter <= 32'b0; led_status = 1'b0; end
always @(posedge clk) begin counter <= counter + 1'b1; if (counter > 5000000) begin led_status <= !led_status; counter <= 32'b0; end end
endmodule
That was a little bit easier, but copy and paste got rid of a lot of the returns at the end of lines. I had to shift-return a bunch of times. Adding FPGA code to this post hasn’t been easy.
A couple days ago I decided to try to blink an LED on the 2019 Hackaday Supercon badge. I tried and failed with many iterations of what I thought would work easily. Yesterday I decided to look up a blink example on the web to see how they were doing it. I could not get any of them to work. What was I doing wrong?
This morning as I was making coffee (pour-over) I started thinking about what I should try next. I have a counter that when it gets to 500000 it should turn on the LED. However, I already have the LED on. So, I decided to turn off the LED when the counter got up to 500000. I didn’t notice in the nesting that counter got reset to 0 (32’b0) in the wrong place and would add on and reset to zero right away. ::smack forehead::
always @(posedge clk) begin
 counter <= counter + 1'b1;
 if (counter > 500000) begin
  ledc[5] = 1'b0;
 end else begin
  ledc[5] = 1'b1;
 end
 counter <= 32'b0;
end
Even when I took moved the reset of the counter to the proper place the LED would not turn off when counter reached 500000. UGH!, because of the else! OK time to change the if statement to if (counter[28]). Still the LED would not turn off.
Poured the first cup of coffee and finished pouring water over the grounds. Caffeine must be helping, change the code to
always @(posedge clk) begin
 counter <= counter + 1'b1;
end

always @(posedge clk) begin
 if (counter > 500000)begin
 ledc[5] = 1'b1;
end else begin
 ledc[5] = 1'b0;
end
That seemed to look OK, but it still didn’t turn off the LED until the the counter got above 500000. Was the clock speed so fast that it got to 500000 too quickly? How about resetting counter when it got to one million? That way the light should be off until 500001 and then back on. Right? … Nope! The LED was still not turning off. Whether I started with the LED off or on the counter would not make a change to the LED.
In a workshop code they assigned LEDs to come on with button presses. Something like press button one and turn on LED 2. When you released the button the LED turned off. They used assign ledc[2] = btn[1]; , and I was using assign ledc[5] = 1'b1; to initialize LED 5 to be on at start up.
I tried many different iterations of if (counter > 500000) and if counter[28] that didn’t work to turn off the LED. The ‘light’ came on above my head while thinking about how they were toggling the LED with a button. I decided to try it sort of like I thought they were doing.
assign ledc[5] = counter[21];

always @(posedge clk) begin
counter <= counter + 1'b1;
end
This worked just fine. The LED number 5 was blinking its fool head off.
A little bit more experimenting is going to help me figure out why trying to use the counter with an if statement would not work. I am starting to think that it is because of the assign command.
I decided to go through the workshop tutorial from 2019 Supercon for this badge. I was running into a few things that I didn’t understand so I searched the web and then bought a book. Not knowing the proper jargon made it difficult to search for some things. Such as:
reg [7:0] membyte {0:1024]
reg [8*18:1] string_value
Not knowing how to look those up was difficult. The book I ordered had those examples with explanations in chapter 3. At least I was getting somewhere.
I was running into some issues with not getting the desired result on the screen when I was editing the C code for the basic part of the workshop. The file is from https://github.com/esden/hadbadge2019_workshops/tree/master/basic/app-basic-workshop .
I kept plugging away at it for a couple of days. One of the difficult things is that the fire palette was not displaying properly with the alpha channel, and when something was assigned to GFXPAL[17] the background color of the screen would change. However, when you pressed the B button to exit the program the set background color would show up as the program was exiting.
I decided to move the definitions of the Alpha channel to further down the list, 224-256, and see what happens. The transparent colors showed up just fine. It seems that the set up should not happen so low in memory.
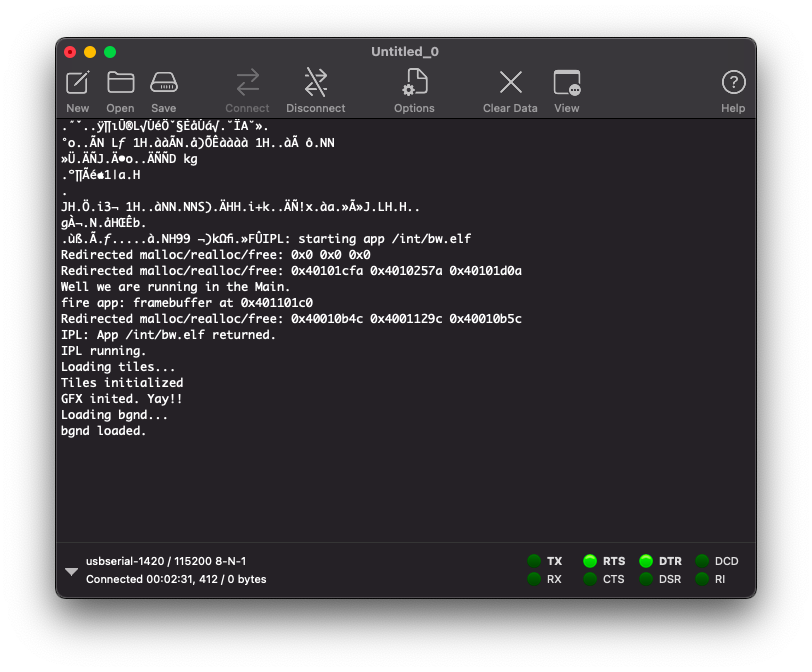
Another thing that was intriguing me is that there are some printf commands with text to be sent out. I had to read some other files to find out that these would be sent out to a terminal program such as CoolTerm so you can read what is sent out.
// The printf output is sent to the physical UART available on the JTAG
// programming connector. You can connect a USB to Serial adapter to
// see this console output.
I got out the USB to Serial adapter I have in a drawer and decided to try to hook it up. First I had to look at the KiCad file to see what the JTAG pins were set to.
It looks like I’d need pins 1, 2, 9, and 10. I decided that since I had batteries I would not need to use pin 1, voltage. I hooked up the black wire on the USB to Serial adapter to pin 2, ground. White (RX) to pin 10 (RX) and Green (TX) to pin 9 (TX). CoolTerm detected the adapter and I added a few printf lines to my program I was testing with. Nothing showed on CoolTerm. I changed the port speed from 9600 to something higher. Still nothing. Then I swapped the white and green wires, RX to TX and TX to RX. I got garbage on the screen at 9600 bd. I moved it up to 115200 and got readable text when I ran the program.
That was a very productive time spent while waiting for a return call from the doctor’s office.
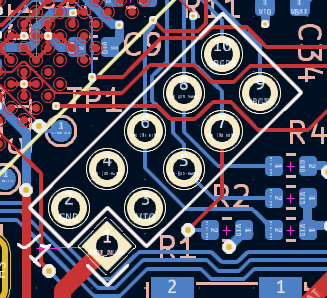
I’ve been reading a lot of Verilog examples and looking up what I don’t understand. One of the challenges for the 2019 Hackaday badge was to get all of the LEDs to light up on the HACK-O-METER. I used magnifier on my phone to be able to view traces and those tiny components. I perused and took notes about what I saw on the KiCad file. I was told that you have to change some of the badge code and recompile it. There may be an LED that is soldered on incorrectly and there may be a trace that needs a jumper soldered on. The LEDs looked to be correct, so I started following traces on the KiCad file. Flipping the view really helped.
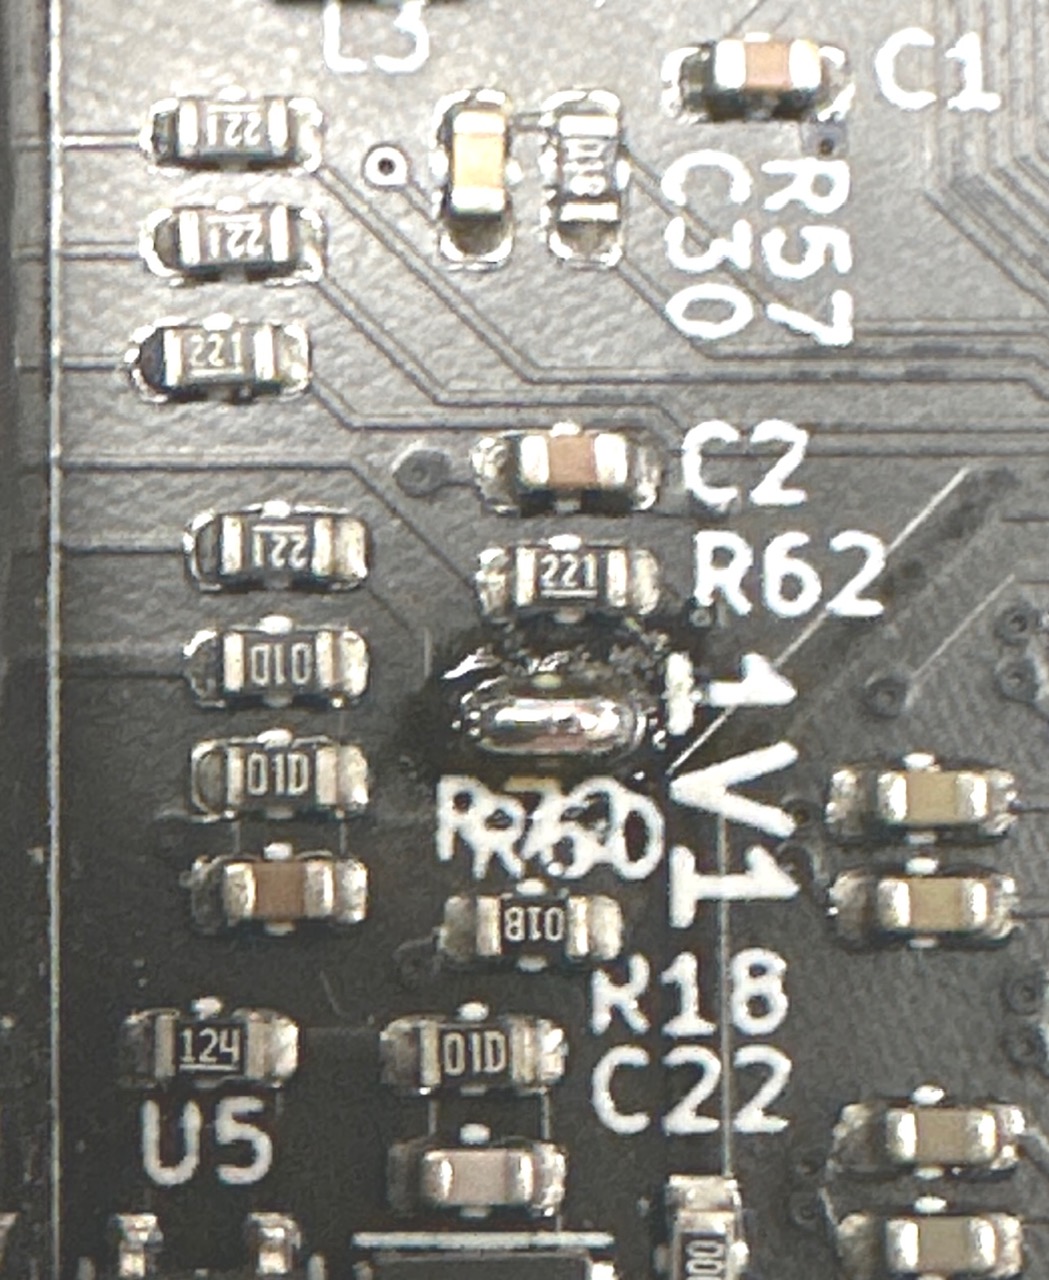
It took a little while but I found what seemed to be a break in the connection. Looking at the back of the actual board showed what could be the spot to solder in a bridge. It is right there above the R72R60 (printed on top of each other), and to the left of the 1V1.
Backside of the HADBadge.
I got the entire set of RGB LEDS to light up, animate and do whatever they should.
I’ll have to admit that I have been busy. Who hasn’t? Time to dust off the cobwebs from this site.
I have been playing a lot of violin. Yesterday we finished a concert and have yet to get the music for the one coming up in November.
A few days ago I got the badge from 2019 Hackaday badge off of the hook behind the violin hanger and decided to see what I can do with it. I never had done anything with the “HACK-O-METER” section on the badge.
I put two AA batteries onto the device and it booted up. I was surprised to find that the programs I had written in 2019 were still available on the badge. This thing is still as awesome as the day I got it.
I have been getting in some brain exercises. I force myself to go to bed at night without staying up too late. Working on badge programming is a lot quieter than practicing violin passages from Handel or Haydn. 32nd notes were proving to be difficult when practicing for two hours. Today, I could use a chiropractor, a dip in a hot tub, and a massage.
Dipping my feet into Verilog again is proving to be a great adventure. Now that I got the LEDs in the HACK-O-METER to blink I can move on to fading them in and out with PDM. Pulse Density Modulation. I have began to read up on that.
I’ll add a post showing what I have been doing on the 2019 HADBadge in a little while. I need to read up on this WordPress update I have been given.
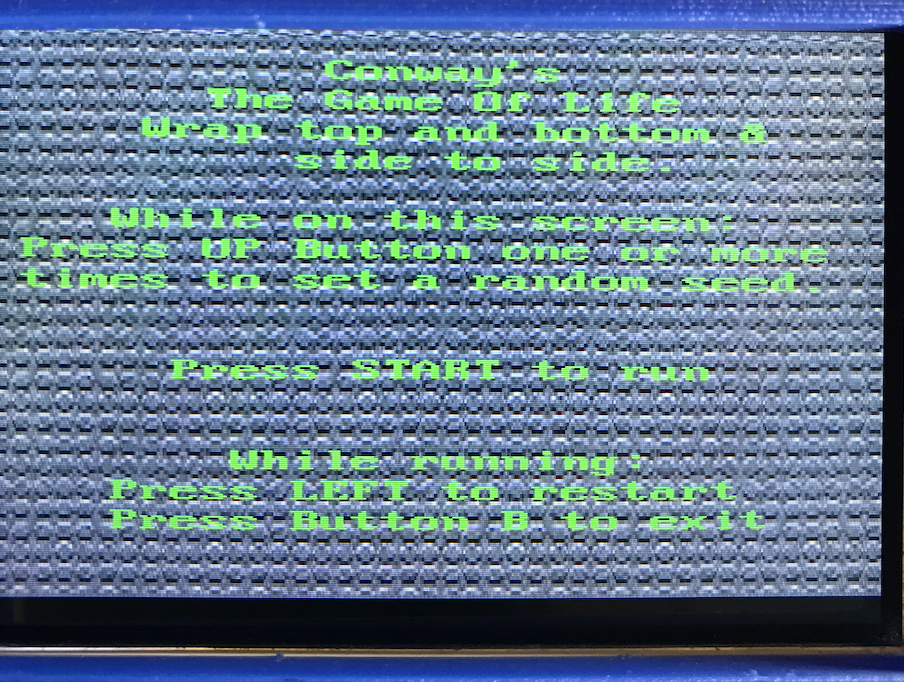
As a project for me to work on I decided to try coding in C Conway’s Game Of Life on the SuperCon Badge. What a hoot and adventure. Every time I thought I was about finished I would think of adding something else and end up breaking something different.
Well, it wasn’t that bad. I really hadn’t programmed in a variant of C like this in a while. ANDs and ORs were not cooperating so I separated them out into their own IF statements. The code began to look ugly, but it worked.
I thought I was finally done and I decided to add a restart button. I ended up writing a little demo program to make sure I had the coding of the buttons correct. All of the examples for checking on button presses included this little bit of code that could cause a delay. Whomever came up with the default code examples for the badge included the “inefficient” delay. Hey, it got the job done.
Once I had the buttons example running I decided to try to get rid of the “inefficient” delay. To get the program running at about the desired speed I had the little section in the MAIN loop running once every 50,000 times. This is a fast little chip on the badge.
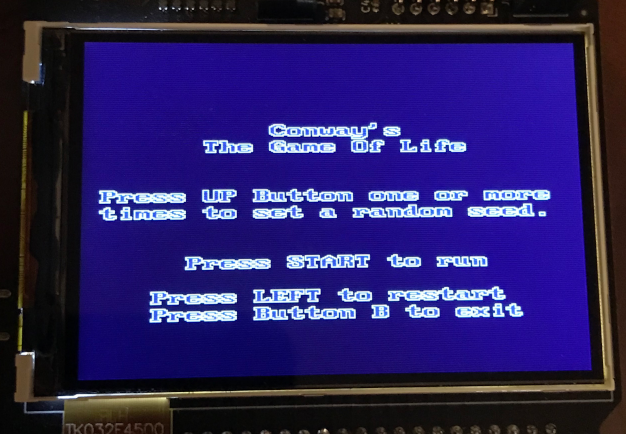
I haven’t taken out the “inefficient” delay loop out of the Game Of Life program, yet, but I am ready to document the story so far. After I got those pictures loaded into the computer and looked at the screen shot of the badge I see a change I’d like to make. I think I need to add a line above the bottom two lines that should say, “While running press:”. This way the person will know that B to exit and LEFT to reset will only happen once the program is running.
There are lots of web pages describing Conway’s Game of Life. Some just give the premise and others offer code snippets. As I understand it, for every space on the screen, if there is already a dot in place in that space then you would look at the eight adjoining, or touching, spaces around the space in question. Add up all of the dots around the space in question. If there are two or three dots the dot in that original space will continue to be a dot. If there are zero or one dots in all the surrounding spaces then the original dot will cease to be a dot and will become an empty space due to starvation. Like wise, if there are four or more dots in total around the original space with a dot that original dot will also cease to exist due to overcrowding. The original spaces that you would check that are in a corner or on the edge of the playing field are at a disadvantage due to less number of spaces surrounding them. You check every space within the playing field before you refresh the screen. I used a second array to hold the results and then sent that to the display.
A second thing to consider is if the space you are checking starts out empty it can become populated with a dot if there are three, and only three, spaces around that original space with a dot in them.
(I just thought that I could have the screen wrap around from bottom to top and left to right. Programming for another day.)
The ‘game’ runs until the screen is empty or certain patterns end up on the screen. A 2×2 block of dots will just sit there, for example. A vertical straight line of three will switch to a horizontal straight line of three and back again.
At one point I thought I was done with the game. It was really boring because it always had the same result. I decided to put in a way to give a random seed into the mix. That shook things up a bit.
At another point when I was checking how other programs were running on the badge I noticed Badgetris turned off those annoying LEDs. They are quite bright and bounce off of my glasses when I am looking at the screen. I included that line from the Badgetris code into my program.
Should I be including code snippets as I go along? Perhaps…
I am going to have to go through the code and add comments so you will know what I am doing.
There was one part that particularly did not work as I was coding. I could not figure out why it would not work. I thought I should be able to use
if (playArea[29][18] == 1 && (holder == 2 || holder ==3)) { newPlayArea[29][18] = 1; } else { newPlayArea[29][18] = 0; } // now check holder status if (playArea[29][18] == 0) { if (holder == 3) { newPlayArea[29][18] = 1; } else { newPlayArea[29][18] = 0; } }
The top part with the AND and OR never went into that area. The screen cleared quickly and the game was over shortly. Splitting the AND and Ors up really helped. But, I think it shouldn’t.
if (playArea[29][18] == 1) { if (holder == 2) { newPlayArea[29][18] = 1; } else if (holder == 3) { newPlayArea[29][18] = 1; } else { newPlayArea[29][18] = 0; } } // now check holder status if (playArea[29][18] == 0) { if (holder == 3) { newPlayArea[29][18] = 1; } else { newPlayArea[29][18] = 0; } }
In actuality I think I had the OR before the AND.
I also had noticed the error in “if(playArea[29][19] = 0;}}”. The error is the 19 should be should be 18.
That just might work with all those extra parantheses. And the OR part is second instead of being checked first as in my original attempt. I’ll go try it and come back with results.
I tried many variations of having three comparisons inside the IF statement. Perhaps I am doing it wrong.
None of the checking three booleans inline worked so I am breaking them all out. It is not that it matters, but smaller code will run a bit quicker.
While I was testing the code I still find that I don’t like the difficult readability of the default text on the screen. I also thought putting a background on the play area would be fun. This could become a never ending project. I don’t want that. 😀
–++–
I have tossed in a background picture. Now it is harder to see the game. I’ll have to create a different character in a tile map and use that as the character. The default blue character with a white outline is blurry looking anyway. I am looking at it with eyes that have over six decades of use.
I changed the tileset so that I can change the color of the font. That was pretty easy to do not that I know that the graphic files should only have 16 colors. In GIMP it is easy to set the colors to indexed and 16 colors. Then you can play with the index so you have the color you want.
I guess I better change the pictures so they match what the screen looks like now.
—+++—
Well, riding in the car back from San Diego while my wife was driving I decided to work on a version of GOL that uses wrapping on the screen. There is now a version that wraps between the top and bottom as well as side to side. The results are different. It was easy to add the code.
I wonder if I can add the code as an option on the main screen. Bet I can, if I want to do that. You can do anything if you put your mind to it.
I still need to post pictures of the game running with a background and green hash characters.
—+++—
I have uploaded files to GitHub for both versions the Game Of Life. There is the version that does not wrap around the screen edges and one that does.
The first link is the one that wraps around the screen. It creates an .elf file that is GOL4. The .elf file is also available so you don’t have to compile the program before copying it to your Hackaday Supercon Badge. There is also a .elf file for GOL2, which is the one that does not wrap around the edges.